Samge0/dsh-plugin-nexterm
dsh-plugin-nexterm
dsh-plugin-nexterm is a community DeepSeek Harness plugin. Read the repository README before installing.
Install
npx @deepseek-ai/dsh plugin --profile web add github:Samge0/dsh-plugin-nextermRestart `dsh web` after install. Bundle APIs can change during the developer preview.
README badge

[](https://dshhub.dev/plugins/dsh-plugin-nexterm)Paste this into your README. The star count updates with every catalog sync.
From the README
Excerpt from Samge0/dsh-plugin-nexterm, cleaned of badges and images.
dsh-plugin-nexterm — Nexterm 机群维护插件(DeepSeek Harness)
通过 Nexterm REST API 把你托管在 Nexterm 里的 SSH 机群带进 DeepSeek Harness(DSH,Cordis 插件体系)会话:自然语言即可单机执行、批量巡检、健康检查、监控查看,DSH 机器上无需任何 SSH 私钥。
功能一览
模型工具(6 个)
| 工具 | 用途 |
|---|---|
nexterm_auth | 连接管理:状态 / 设置服务器地址 / 账号密码登录(支持 TOTP)/ 设备授权码登录(免密码)/ 手动 token / 登出 |
nexterm_list | 机群清单:文件夹路径、协议、IP、在线状态、标签;支持 ID/关键词/协议过滤 |
nexterm_exec | 单机执行命令:stdout/stderr/exitCode,超时控制,长任务 nohup 指引 |
nexterm_batch | 批量并行执行(并发 1~10 可调,单批上限 50 台),逐台结果汇总 |
nexterm_health_check | 批量健康检查:quick/full/disk/load/service/updates 预设 + 自动判定 healthy/warning/critical/unreachable |
nexterm_monitoring | Nexterm 内置监控快照(CPU/内存/磁盘使用率) |
GUI 界面
- 设置页:
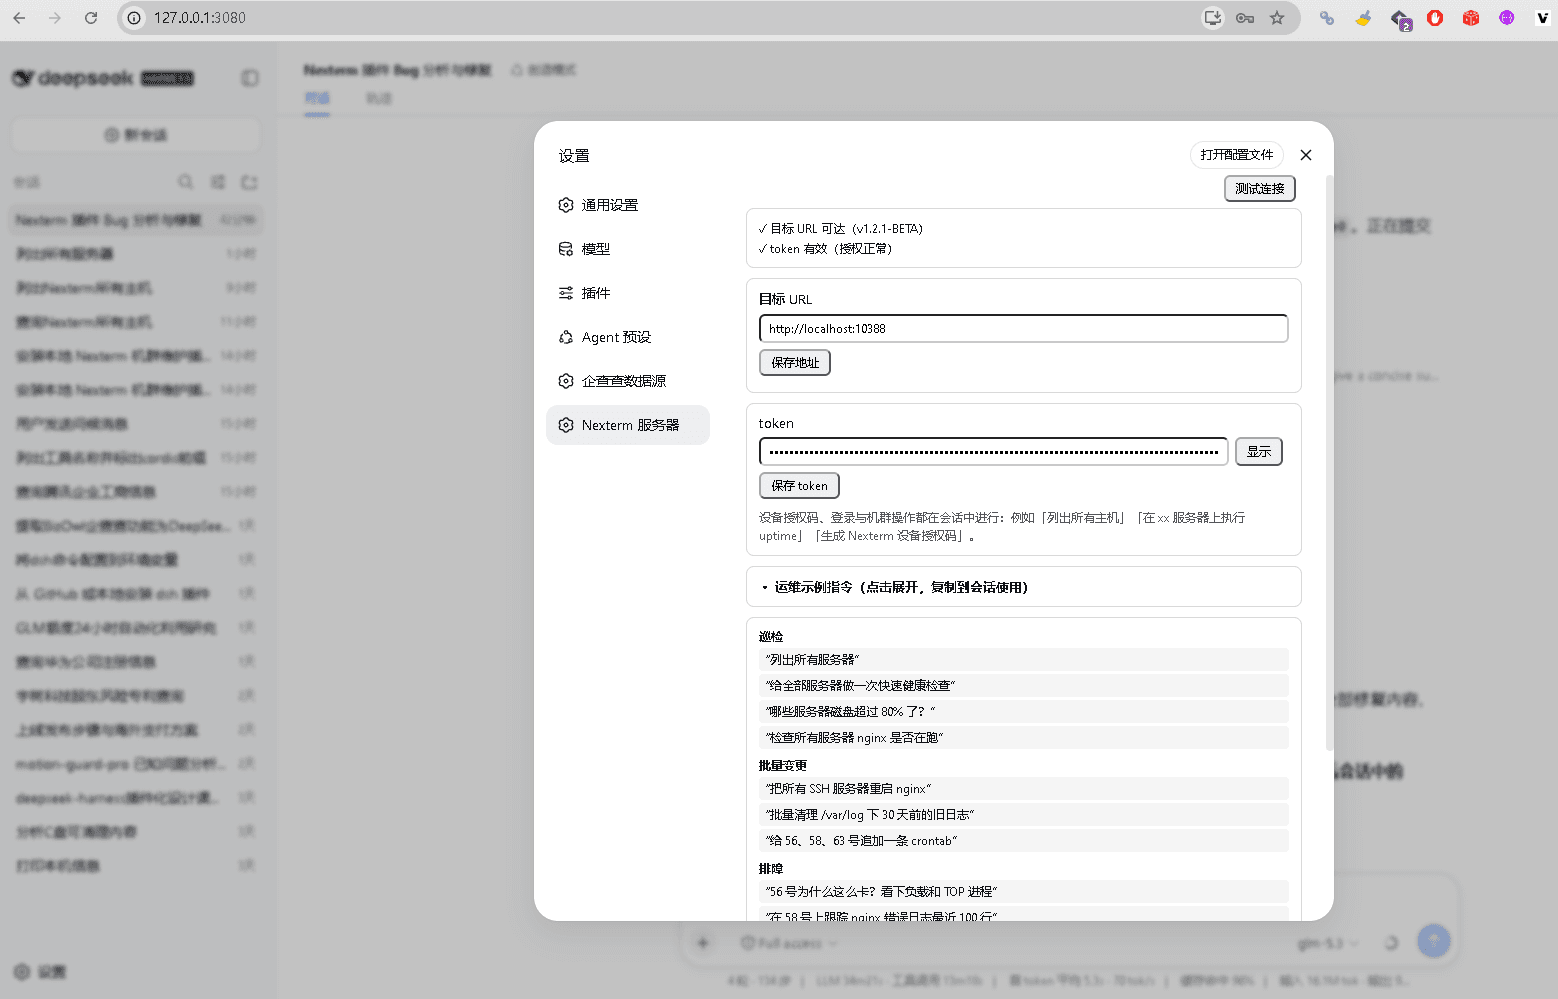
设置 → Nexterm 服务器—— 只有三样东西:目标 URL、默认 token、测试连接(只测 URL 可达性 + token 授权,秒级完成)。登录、设备授权码、机群操作全部在会话窗口用自然语言完成(如「列出所有主机」「生成 Nexterm 设备授权码」)
工作原理
- 标准 Cordis 插件包,
dsh plugin add一次安装、重启后仍生效,常驻~/.dsh/profiles/web/ - Host 半注册 6 个工具 + 一个同源 HTTP API(
/nexterm/v1/api,设置页用);Client 半经dsh.clientmanifest 自动发现并注册设置页 - 全部走 Nexterm REST API(
/api/entries/list、/api/connections/{id}/exec、/api/monitoring/{id}),凭证只需一个 Nexterm 会话 token - 凭证存于
~/.dsh-plugin-nexterm/config.json(原子写入,损坏自动回退默认值)
环境要求
- DeepSeek Harness ≥ 0.1.0-rc.5(含
dsh plugin命令) - Node.js ≥ 22
- 一个 Nexterm 服务器(≥ 1.2.0,Docker 或裸机均可),DSH 所在机器能访问其 HTTP 端口
- 一个 Nexterm 账号(未开启 TOTP 用密码登录最简单;开启了 TOTP 推荐设备授权码方式)
安装
两种形态任选:持久化安装(推荐) 装一次永久生效、随 DSH 自动加载;动态试用 一条消息即装即用,但随 DSH 重启消失(适合先体验)。
方式一:持久化安装(推荐)
# 从 GitHub 直接安装到 web profile(headless 用 --profile headless)
dsh plugin --profile web add github:Samge0/dsh-plugin-nexterm

# 或从本地克隆安装(便于改代码调试)
git clone https://github.com/Samge0/dsh-plugin-nexterm.git
dsh plugin --profile web add file:F:/path/to/dsh-plugin-nexterm
💡 找不到
dsh命令? 源码方式运行的 Harness 需在源码仓库根目录加pnpm前缀:pnpm dsh plugin --profile web add github:Samge0/dsh-plugin-nexterm
然后重启 DSH。启动后新会话中 agent 自动获得 6 个 nexterm_* 工具,设置页出现 设置 → Nexterm 服务器。
卸载:dsh plugin --profile web remove dsh-plugin-nexterm,然后重启 DSH。
方式二:动态试用(免重启,会话级)
git clone https://github.com/Samge0/dsh-plugin-nexterm.git
cd dsh-plugin-nexterm
./install.ps1          # 校验环境,并把"安装提示词"复制到剪贴板
打开 DSH Web GUI(http://127.0.0.1:3080),新建会话,把剪贴板内容粘贴发送即可。agent 会读取 plugin/host.js 与 plugin/client.js,经 cordis_define/cordis_run 激活;首次激活可能弹出授权提示,确认即可。
动态形态说明:
- 是会话级的,DSH 重启后需重新发送提示词(要永久生效请用方式一)
- 网络与文件 IO 走 DSH subprocess 服务(spawn
node -e),需要当前会话预设支持动态插件(如「创造模式」;「标准模式」未暴露 cordis_* 工具) - 与持久化版不要同装在一个 DSH 实例:两形态注册相同的 6 个
nexterm_*工具名,后装的一方会报tool "nexterm_auth" is already registered。已装持久化版就无需动态版;想试动态版先dsh plugin --profile web remove dsh-plugin-nexterm并重启 - 凭证与持久化版互通(同一个
~/.dsh-plugin-nexterm/config.json),切换形态无需重新登录 - 卸载:对 agent 说 "彻底卸载 Nexterm 机群维护插件"(
cordis_undefine),或直接结束会话
默认值配置(免每次输入 URL / token)
插件只保存一组 url + token(~/.dsh-plugin-nexterm/config.json),设置页或 nexterm_auth 的 set_server / set_token 保存即替换。取值优先级(从高到低):
- 工具参数:任何
nexterm_*工具调用可带serverUrl/token,仅本次生效 - 环境变量(部署级默认,仅持久化形态——动态沙箱内没有
process全局,且含TOKEN的变量名不会传给子进程):NEXTERM_SERVER_URL/NEXTERM_SESSION_TOKEN - DSH profile 配置(部署级默认,持久化形态):
~/.dsh/profiles/web/cordis.patch.yml里给插件行加config:
…